Tasks
Docx Templating
Generates personalized Word documents by merging JSON data into DOCX templates. Useful for contracts, letters, reports, and document automation.
Basic usage
Parameters
doc_templates required objects
The parameters for the docx template files
Show child attributes
files optional array
Contains the docx template file(s) which contain placeholders to be replaced. This parameter only accepts files. Either this or the fileuuids parameter must be present.
fileuuids optional array
The fileuuids of docx template file(s) which contain placeholders to be replaced. This parameter only accepts fileuuids.
settings required object
The settings for the task
Show child attributes
set_filename required string
The name of the output file. .docx will automatically be appended to the output file's name. If there are multiple template
files, the filenames will be the same with a number appended to the end of it to indicate its index.
output_format optional string
The output format for the document. Available values are pdf, docx.
If this setting is omitted, the outputted document will be of filetype docx
compile_data required object
The JSON object containing the data to replace the placeholders in the template file(s).
The JSON Keys in the compile_data can not contain any spaces.
For example, the following would be invalid:
It should rather be:
Result
Properties
compiled_files
An array containing all the fileuuid(s) and filename(s) of template(s) that have been compiled.
Examples
Basic Usage
This example will show you how to set up a basic template to be compiled.
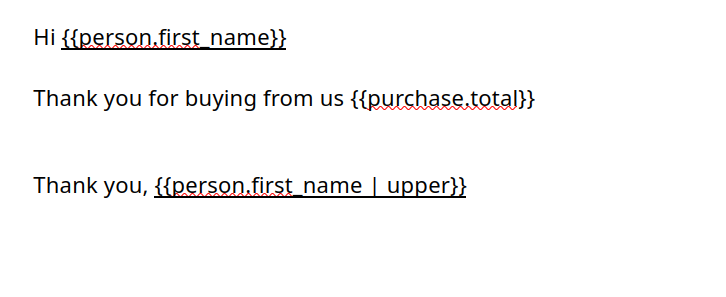
Place placeholders in the format {{placeholder_path}} in your document. The placeholder_path is the path in the JSON data from which
the value is found to replace the placeholder.
The image below contains an example of a section of a template document.
The compile_data can then be as follows:
The task will replace the placeholders with the data in compile_data resulting in the outputted docx document to look as follows:

Notice how the final Bob is capitalized, this is due to the upper in the template document. Using upper or lower in a placeholder after the placeholder JSON location and | divider, will make the value uppercase and lowercase respectively. For example: {{person.first_name | upper}} or {{person.first_name | lower}}
Loops and Tables
This example will show you how to create a table by looping over an array in compile_data.
In order to loop through an array create the placeholder as follows: {{#array_name}} {{key_in_array}} {{/array_name}}. The image below contains an example of a table in a template document:
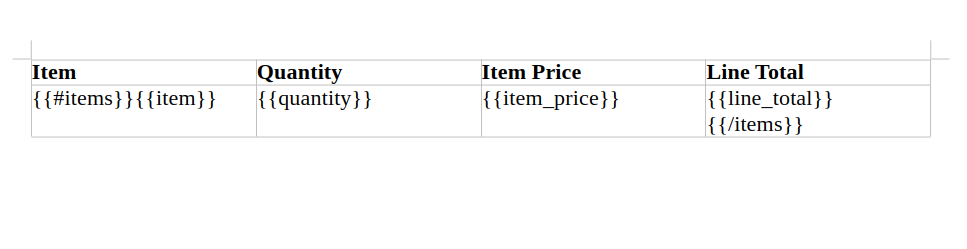
Take note that the placeholders within the loop do not contain the entire hierarchy. When looping declare the loop with {{#array_name}} and this will automatically be added to the values in the loop e.g: {{quantity}} is actually items.quantity but because it is within a loop, the upper level hierarchies are not required and quantity is written without items
The compile_data for this example is:
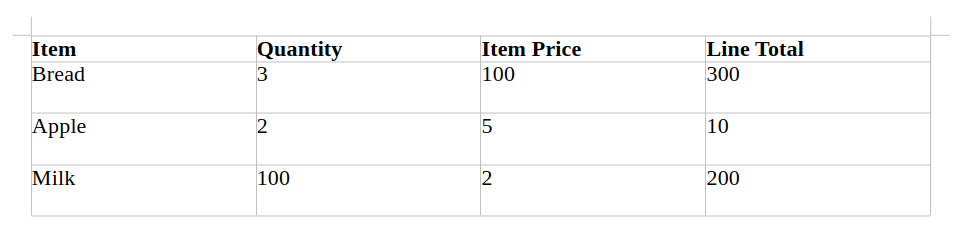
The output document will contain the following:
Charts
You can dynamically generate charts in your Word document using docx templating.
Here’s how it works:
Insert a chart into your Word template.
Create a chart in your .docx template (e.g. bar, line, pie, etc.).
Give the chart a title that matches the path in your JSON data. For example, if your JSON path is Chart, the chart title in Word should be Chart.
Define your chart data in JSON.
- The JSON path matching your chart’s title should contain:
_type: Always set this to "chart".
title: The chart’s title (for display inside the chart).
categories: The X-axis values (e.g. months, product names, etc.).
series: An array of data series plotted on the Y-axis.
- The JSON path matching your chart’s title should contain:
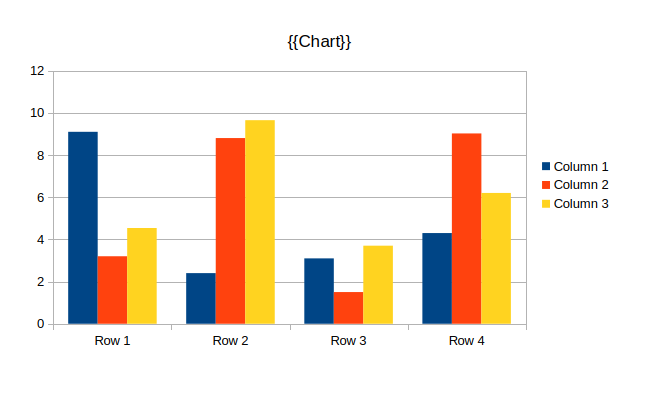
Chart Example
Let’s say you want a chart showing Income, Expenses, and Profit across four months.
Template Setup:
Create a default chart in your Word document.
Set the chart title in Word to:
{{Chart}}.
Your template might look like this:
Here’s the compile_data JSON to fill that chart:
Using the above compile_data we get the following in the output file:
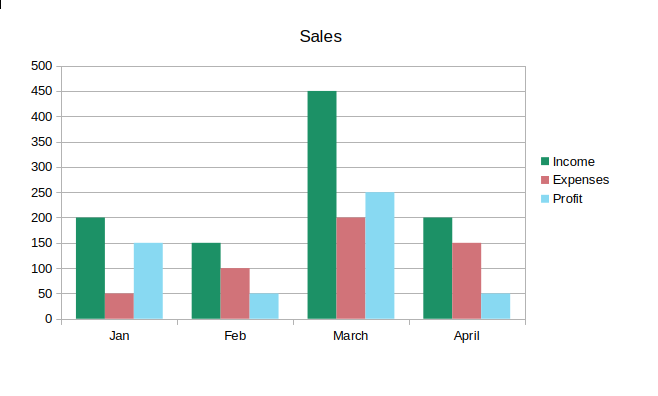
Explanation
- Chart: Matches the placeholder in the chart title in the template.
- _type: Must always be
chartfor charts. - title: The title to be shown on the chart.
- categories.names: The labels on the X-axis (in this case: months).
- series: Data plotted on the Y-axis. Each object in this array represents one dataset:
- name: The series name in the legend.
- color: The color of the series.
- values: Numeric values for each category.
Conditional Statements
It is possible to insert conditional values into the template document that evaluate whether a value in compile_data is true or false. This can then be used to conditionally show sections of the document.
To show a section of a document if a value is true use {{#value_to_be_evaluated}} followed by the section of the document which should only be shown if this value is true. To mark the end of the conditional section use {{/value_to_be_evaluated}}.
The same can be done if you want to show a section of a document if a value is false by starting the section with {{#!value_to_be_evaluated}} and ending the section with {{/value_to_be_evaluated}}.
Conditional Example
For this example we will set up the template document as follows:
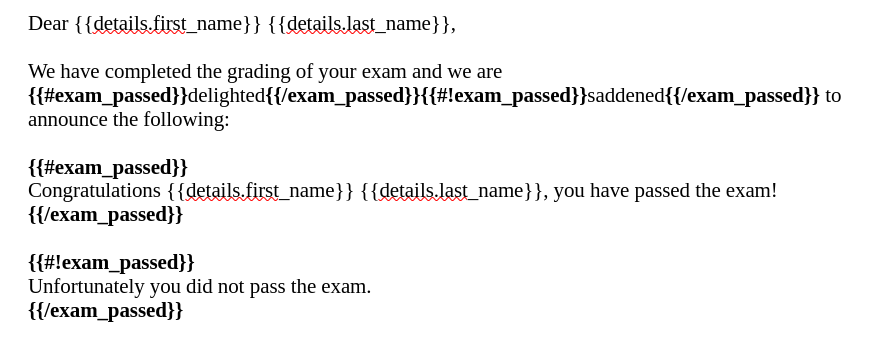
This has a conditional expression in the line to determine whether to use the word delighted if the value exam_passed is true in the compile_data or to use saddened if the value exam_passed is false in the compile_data. It then has two sections, one congratulating the student which will be shown if exam_passed is true and the other which is announcing that the student did not pass if exam_passed is false.
The compile_data for the example would look as follows:
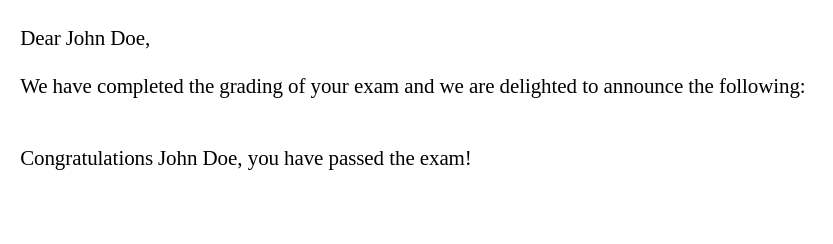
If exam_passed is true then the output document will look as follows:
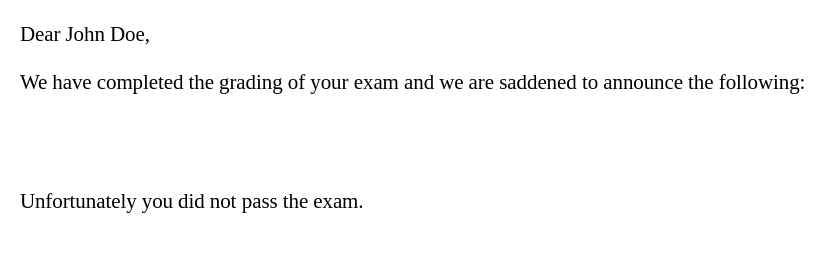
If exam_passed is false then the output document will look as follows:
Images
The docx_templating task supports inserting images into your Word document templates.
To insert an image:
- Place an image placeholder in your template document in the format:
{{your_placeholder_image}}. - In your
compile_dataJSON. define the placeholder as an object with the following properties:
Property Details
\_type: Must always be "image" to indicate that this object represents an image.source:The URL of the image to insert.width: The width of the image in pixels. If omitted, the image will default to a width of 0.height: The height of the image in pixels. If omitted, the image will default to a height of 0.altText: The alternative text description for the image, used for accessibility.transparencyPercent: Sets the image’s transparency level as a percentage (0 = fully opaque, 100 = fully transparent).format: The image’s MIME type, e.g. "image/png" or "image/jpeg". Helps ensure the image is embedded with the correct format.
Image Example
For this example we will set up the template document as follows:

The compile data will be as follows:
and the result will look as follows:

Like the other placeholders, the image will inherit the placeholder's styling and alignment. Meaning you can set where the image will be when the task is run.