Integrations
AI Assistant Tutorial
Introduction
By the end of this tutorial you'll be able to build an AI Assistant in Stubber.
Prerequisites
Methods of Interaction
You can use any method to interact between the user and the AI Assistant that Stubber employs. The simplest is WhatsApp, as everyone is so used to chatting with someone on this platform.
In this tutorial, we will be using WhatsApp as a means to chat back and forth between the AI and the user, remembering that you can branch out to use other channels of communication.
Phases
We are going to break this tutorial into 3 Phases:
- Preparing the Canvas
- Initiating the Chat
- Building the Chat Loop
Preparing the Canvas
Basic Flow
Open up the Editor and create new Template using any name you choose. It is good you give it a name that describes what it does, eg. Sales Quote AI Assistant.
States
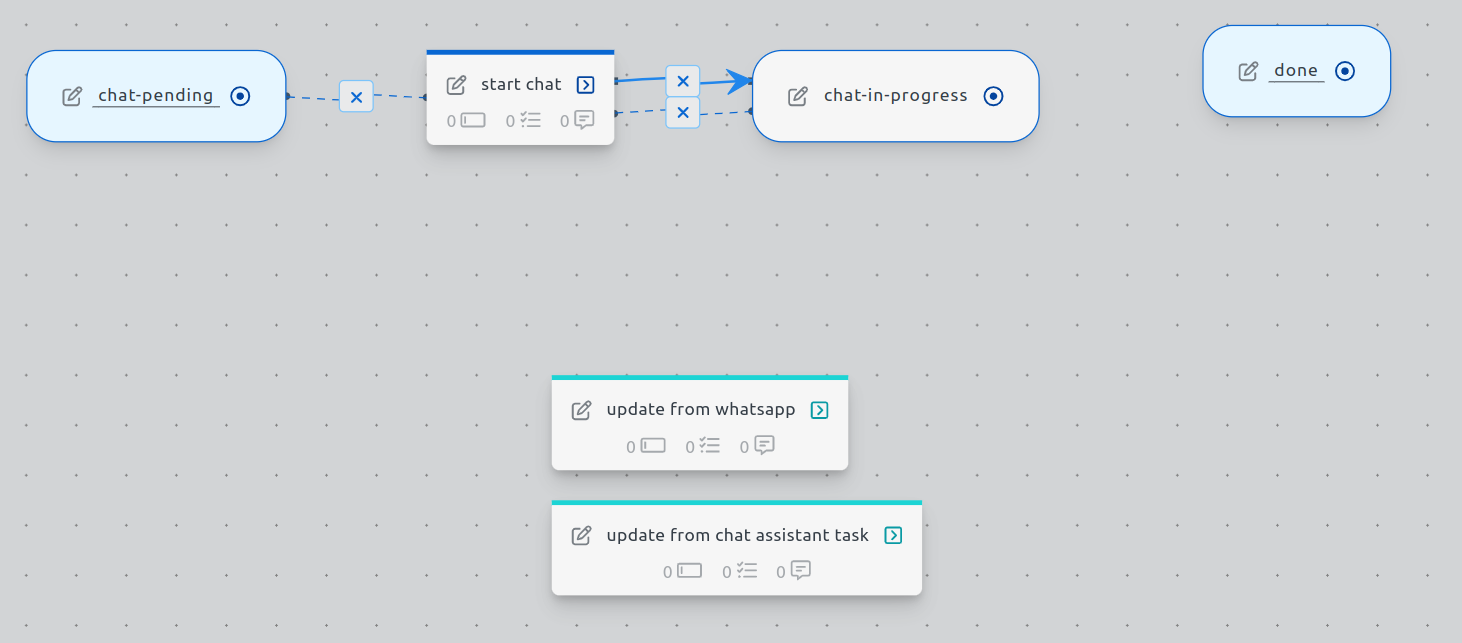
You will need the following states:
- busy start state in which the stub will start:
chat-pending - the state where the interaction will be facilitated:
chat-in-progress
Actions
- feedback Actions:
_update_from_whatsappwhere incoming whatsapp are added to the stub_update_from_chat_assistant_taskwhere the AI updates the stub with its response.
- Action to setup the chat log and initiate the conversation with the end user.
start_chat
Creating the Flow
Link the states and actions:
- Link chat-pendingstate tostart_chataction making the action available in thechat-pendingstate
- Link start_chataction to thechat-in-progressstate. Moving the stub to thechat-in-progressstate when the action is run
- Link the chat-in-progressstate back to the thestart_chataction so that you can restart the chat from thechat-in-progressstate
Your canvas should look like this:

Contact list
Creates the Contact list where stubs can add contacts for notifications, etc.
- Open View Contact Lists and Add a blank contact list.
- change the object key to something meaningful, eg.
contact_person - expand the object and expand the details object
- change the title's value, eg.
Contact Person - close the Important Contacts window.
System Prompt
The system prompt needs to be somewhere the is easily accessable by the systems designer as well as accessable by the process.
Adding this to template data resolves both these requirements:
- Click on the Add Template Data button

- Set the Data Path to
prompts.ai_instructions- full path to reference within tasks is:
~~template.data.prompts.ai_instructions
- full path to reference within tasks is:
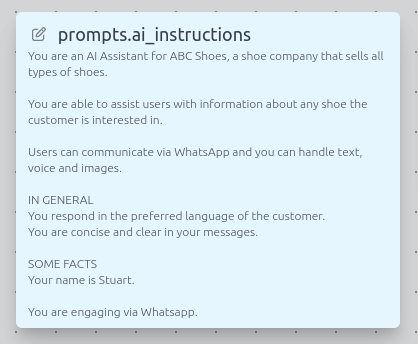
- Edit the Template Data annotation and start adding in the system prompt text.
Example:
Set the Initial message that is sent to the user
This will create a central point on the canvas to set what the first contact message will be.
This makes it easy to change and it will change in the notification and in the GPT task that initiats the Chat Log.
- Add Template Data
- set the path to:
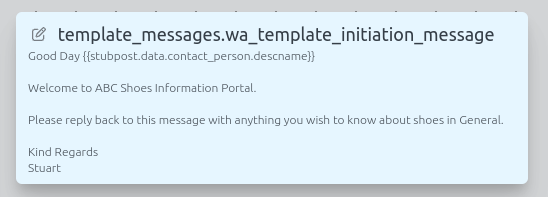
template_messages.wa_template_initiation_message - edit the annotation and input the message the user would receive, eg.
Example:

Initiating the Chat
To start the whole chat processes, the following is required in:
- the stub needs some initial data, especially who it needs to communicate with
- the notification for first contact needs to be sent to the contact
- gpt chat log needs to be initiated with the first contact message.
Do the following in
Fields
- Add a Contact Selector field and give it a name, eg.
contact_person
Tasks
- Add a Add contact to a list task
- Change the contactuuid key's value to reference the contact selector field to created, eg.
~~stubpost.data.contact_person.contactuuid - click Add this item and name the task, eg.
add_contact_contact_person
- Change the contactuuid key's value to reference the contact selector field to created, eg.
- Add the gpt_task to start the chat_log for this stub
- Add a gpt task from the tasks library and ensure the params are as below.
GPT Chat Task Parameter Explained
submit_to_model
This is set to false so that it does not submit the job to GPT itself
model
This is set to use the GPT Model as defined in and inherited from the _adam template.
Can be change if you wish you use something other than the default model.
message_operation
This is set to set so that will either create the chat log if it does not already exist or replaces the existing chat log so that the conversation can be restarted, GPT would have no record of previous messages for that stub / chat
messages
This is an array of objects. Each object is a message that is added to the chat log.
role: system : Fetches the system prompt and adds it to the Chat Log as the system role.
role: assistant : Fetches the first contact message and adds it to the Chat Log as the assistant role, as it the AI Assistant came up with the message and sent it to the user.
Notification
Add a notification to send the first contact message to the user. In this case we are using WhatsApp as a means to communicate.
- Add Whatsapp text message to contact list notification
- make changes to match this use case and stub data structure.
- change the message to :
~~template.data.template_messages.wa_template_initiation_message - change the send_to value :
contact_person - change the stub session timeout to :
164
- change the message to :
- Add the item, you can rename it once you have added the notification
Building the Chat Loop
User replies to AI Assistant
In order for the GPT to know what the customer is replying, we need to send the customers' reply to GPT.
We do this by overriding the function of Feedback Action for the notification method being used, in this case, WhatsApp, ie.
- Add task Continue GPT Chat Task to _update_from_whatsappfrom the Tasks Library.
Text from WhatsApp are automatically added to the post as stubpost.message so that will be the message from the role : user
This will send the message to the model and store the customer's reply in the Chat log.
AI Assistant responses to User
Once GPT has received and processed the customers reply, it will process it and send a reply back to the stub, which in turn needs to be sent as a reply back to the customer.
We do this by overriding the function of Feedback Action for the Chat Assistant, ie.
Make these changes to
- Add WhatApp Notification to send the Chat Assistants' reply to the customer via the chosen notification method, ie. WhatsApp
Most responses from Chat Assistant is in plain text. WhatsApp Notification message uses plain text Stub post message uses HTML
- Use a savedata task to save the text version of Chat Assistants' message
- replace the stubpost message with an HTML Version of the message with us of helper.
- notification to use the savedata version of Chat Assistant's response.
Related to tip
Tasks:
Notification:
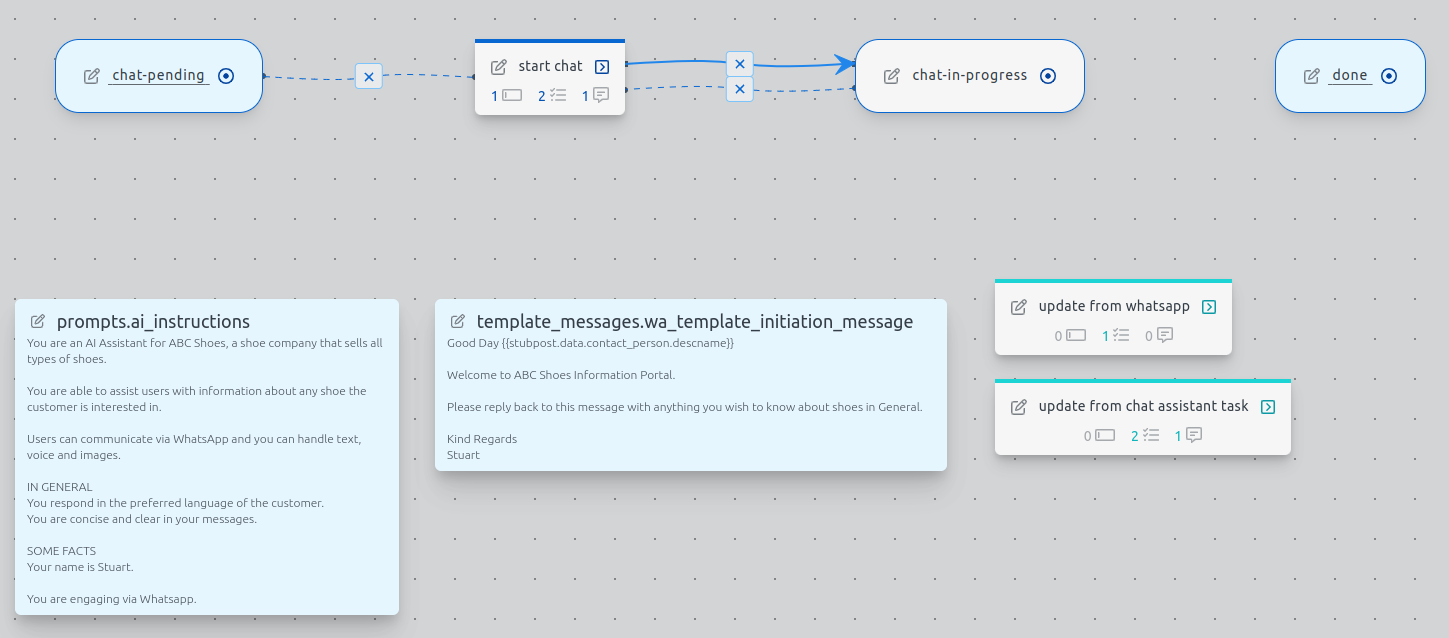
Canvas Result
Your Canvas should be similar to this:
