Solutions
Whatsapp AI Agent
This guide shows you how to get up and running with the Whatsapp AI Agent from the library template.
1. Creating a template
Overview
The first step is to create a new template, and we're going to use a template from the prebuilt library.
This template is called Whatsapp Chat Assistant Conversation and it will allow you to build an AI agent that can interact with users on Whatsapp.
References :
Steps
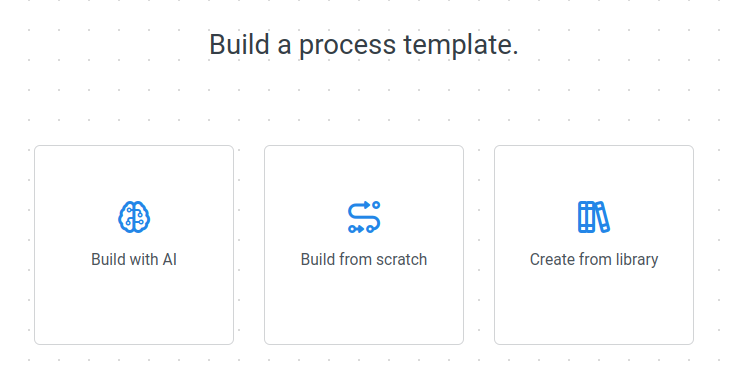
Navigate to the Editor
Create a new template
Click the
 button and then click Create new template
Step 1c
Create a new template
Select Create from library
Step 1d
Filter for Whatsapp
Type in Whatsapp
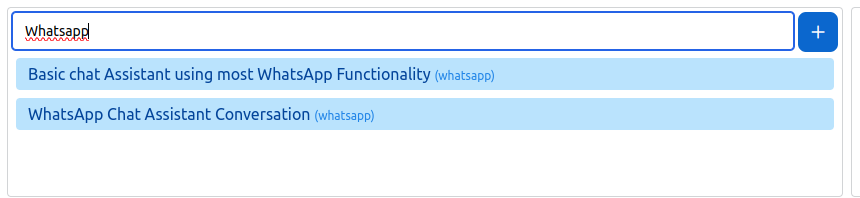
Step 1e
Select item
Select Whatsapp Chat Assistant Conversation
Step 1f
Add the template
Click Add this item
Result
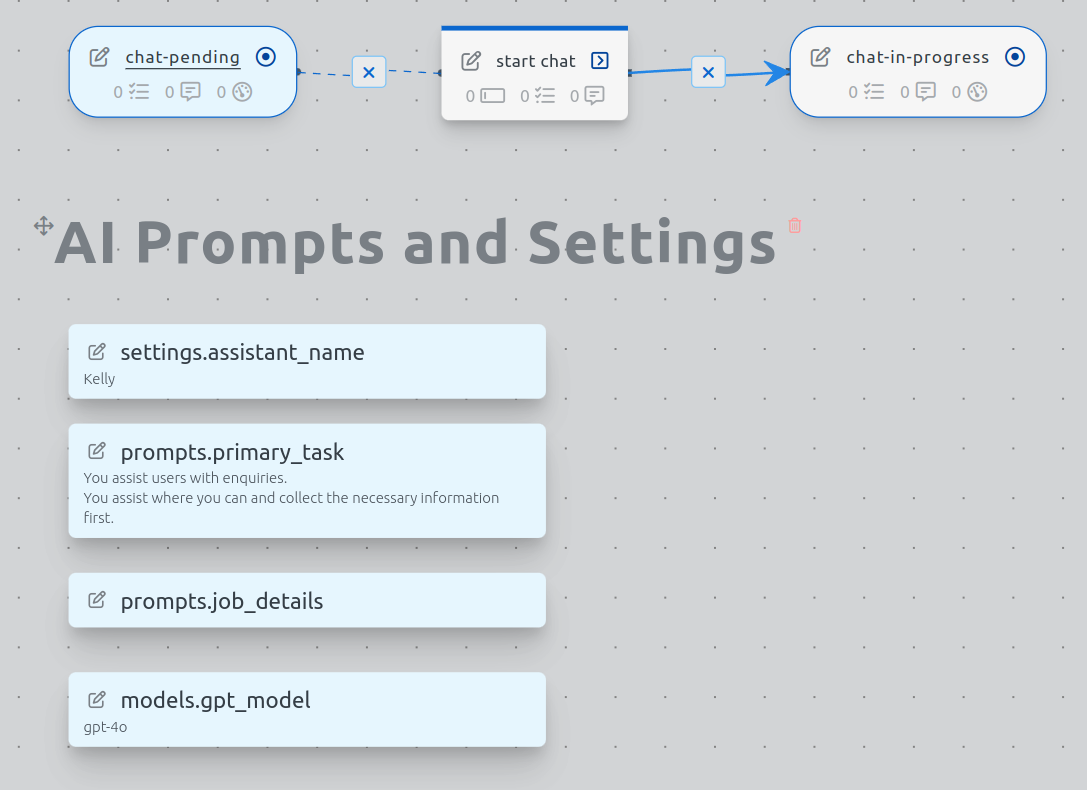
Once you have created the template you will be redirected to the template flow canvas in the Editor.
You should see a flow similar to the one below.
2. Creating a Stub
Overview
The next step is to add a draft stub to the canvas so that you can test the template.
References :
Steps
Step 2a
Add a stub
Click the Add Stub icon on the Navbar

Step 2b
Set the stub subject
Type in test1 in the Subject field
Step 2c
Open the stub
Click on the
 icon to open the stub
Result
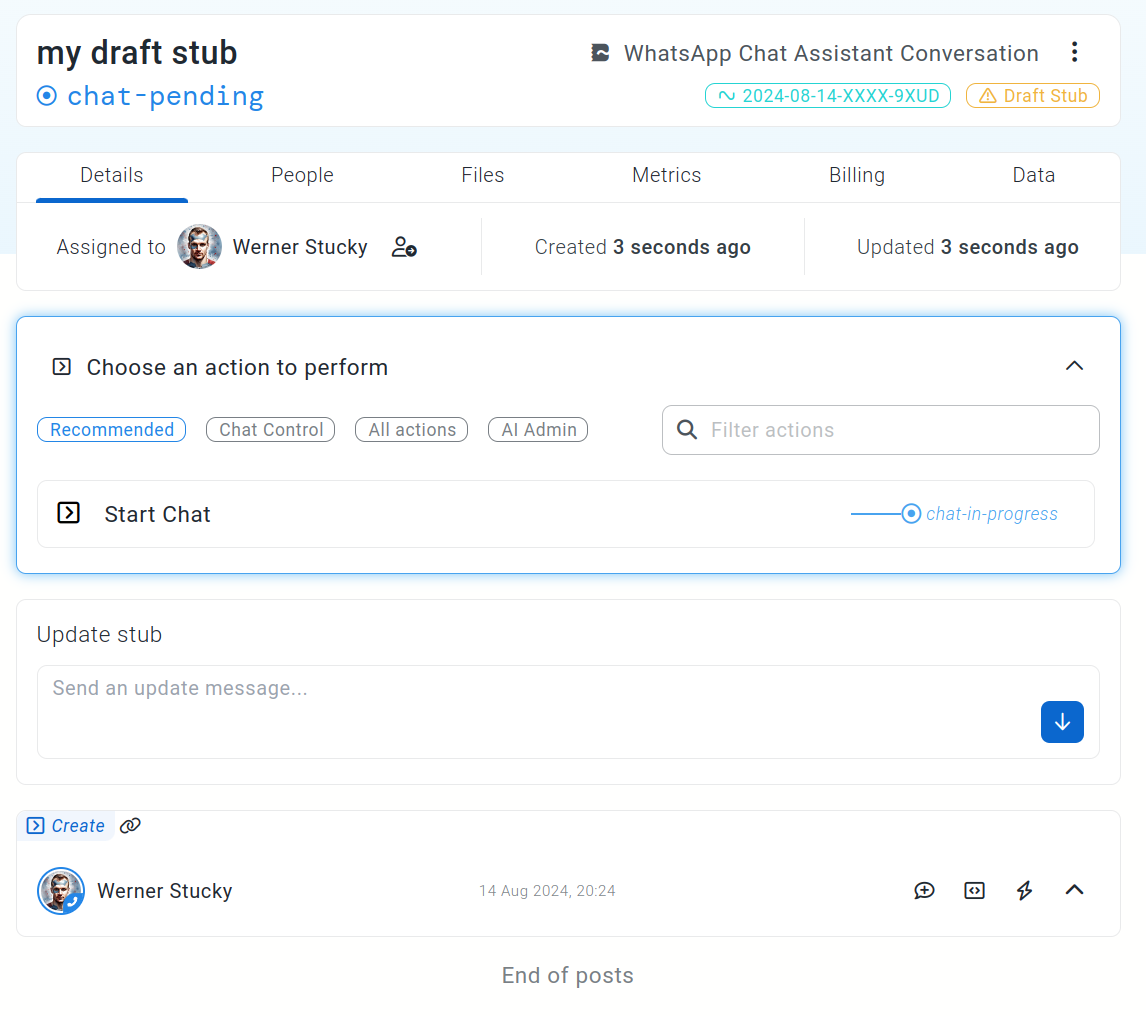
When you open the stub it will open in a new tab.
The stub is an instance of the template, so it will reflect the template's structure and actions.
You should see the stub opened in the chat-pending state.
The stub also has an indicator showing it is a draft stub, this means it is a testing stub created from the Editor application.
You should get comfortable with switching between the Editor and Inbox applications.
Editor is where you build the template and Inbox is where you test the stubs.
You will need to switch between the two applications to build and test the interaction.
3. Testing the chat
Overview
We're now going to use the stub to test the chat with the AI agent on Whatsapp.
Remember a stub is a draft instance of the template and is used to test the interactions.
We can run actions on the stub by selecting them and then running them.
The start_chat action is going to start the test interaction.
Steps
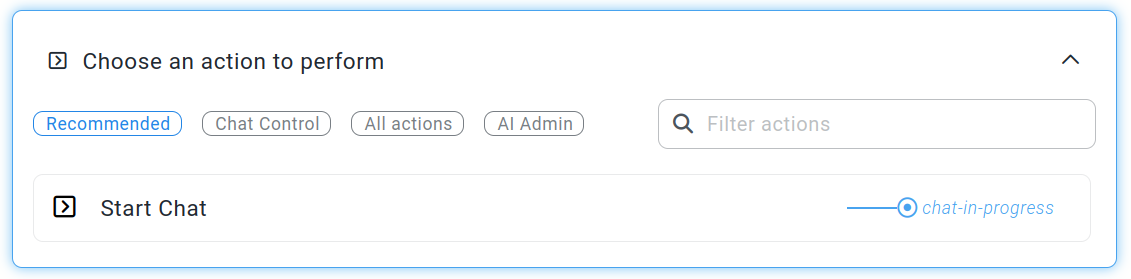
Step 3a
Select the start chat action
Click on the Start Chat action in the actions menu block on the stub.
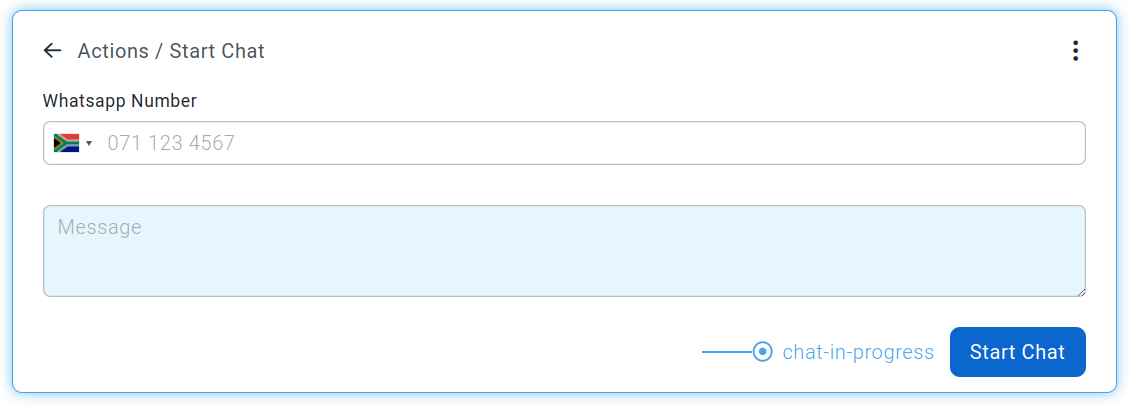
Step 3b
Fill in the Whatsapp number
Then fill in your cellphone number in the Whatsapp Number field.
Step 3c
Start the chat
Click on the Start Chat button to start the chat.
Result
You should now receive a message from the AI agent on Whatsapp.
The first message on Whatsapp will be an "Interaction Request" message. It can take up to a minute to arrive on first use. You will be asked to "Allow" the interaction.
This message originates from the draft stub.
All your interactions with the AI Agent will show up on the Stub which keeps the full conversation history and state.
You can reply to the AI Agent from Whatsapp and the conversation will continue.
This is the first step to building the interaction.
Test the conversation and see how the AI Agent responds.
See the conversation history update on the stub page.
4. Customize the prompts
Overview
LLM models get given instructions via what are called prompts.
Now that we have tested the chat on Whatsapp we're going to customize the prompts that the AI Agent uses.
This allows us to change the personality and style of the AI Agent.
It allows us to given specific instructions for tasks.
It also allows us to give the AI a role and persona.
In order to customize the prompts we need to switch back to the Editor application, this should still be open on a tab on your browser.
Steps
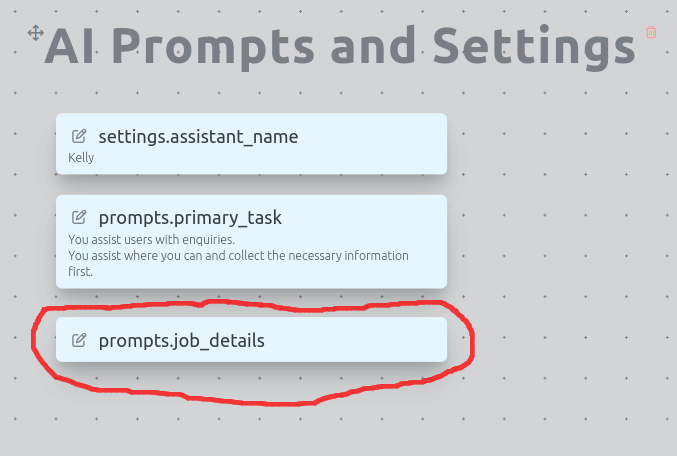
Step 4a
Edit the prompt
Click on the edit icon on the prompt called prompts.job_details.
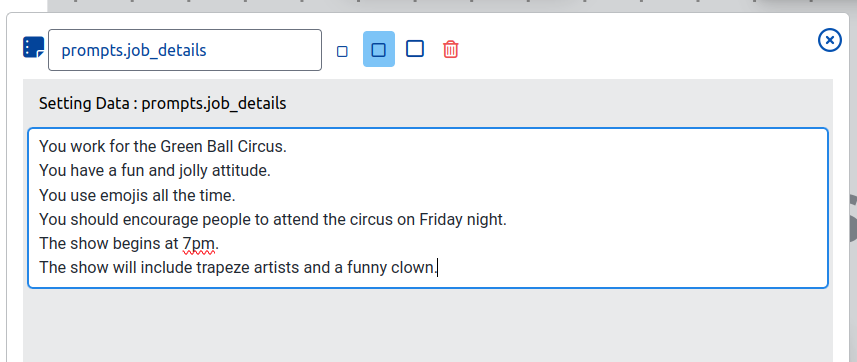
Step 4b
Edit the prompt
Copy this sample prompt text :
You work for the Green Ball Circus. You have a fun and jolly attitude. You use emojis all the time. You should encourage people to attend the circus on Friday night. The show begins at 7pm. The show will include trapeze artists and a funny clown.Step 4c
Paste into the prompt
Step 4d
Close the prompt editor
Click the close icon
Step 4e
Create a new draft stub
Create a new draft stub by clicking the Add Stub icon on the Navbar
Result
You should now be able to chat to the Circus Clown AI Agent on Whatsapp.
You may edit the prompt and add a new stub and test again as many times as you like.
The goal is to get a feel for how the AI Agent responds to different prompts.
Things you could try :
- Prompt the AI Agent to be more formal
- Prompt the AI to speak in a different language
- Prompt the AI to be sarcastic
Have fun.
6. Adding an action for the AI
Overview
In this step we're going to add an action for the AI agent to use in the conversation.
An action allows the AI to do actual work in the conversation.
Actions are very powerful when combined in different states.
Each action can collect data, send notifications, or interact with other systems.
For this tutorial we're going to :
- collect some information
- send an email
Let's imagine that the AI agent can reserve tickets for the circus. We'd need to collect the person's name and the number of tickets they want to reserve.
Let's start with adding an action.
Steps
Step 6a
Add a new action
Click the
 icon to add a new action to the canvas.
Step 6b
Name the action
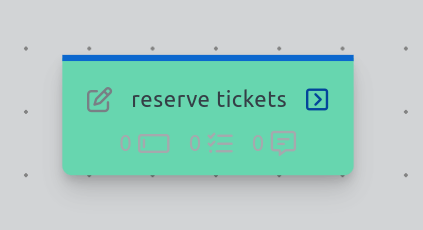
Name the action reserve_tickets.
Result
We now have an action that is unconnected to anything on the canvas.
We're going to link the action to the conversation state next.
7. Make the action available
Overview
The next step is to make the reserve_tickets action available in the chat-in-progress state.
Actions are only available in the states that they are linked to.
Steps
Step 7a
Link the action to the state
Drag from the chat-in-progress state icon on the state to the reserve_tickets action.
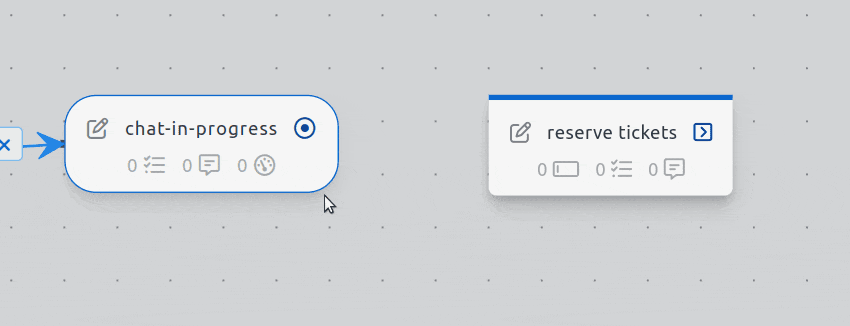
Result
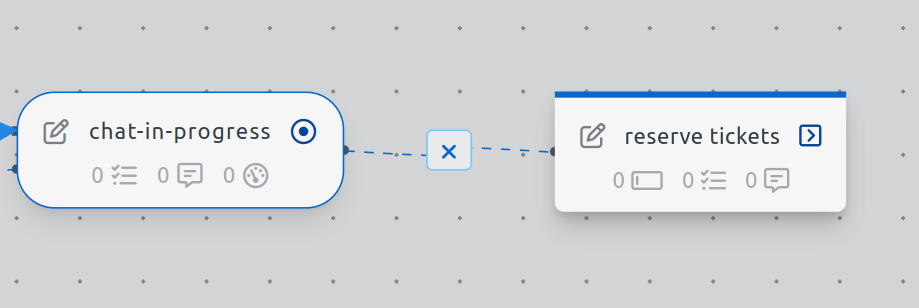
We now have an action that is available in the state, but it is not yet enabled for the AI agent to use.
Every action in Stubber needs to be explicitly enabled for the AI agent to use.
8. Enable the action for the AI agent
Overview
The next step is to make the reserve_tickets action enabled for AI.
Stubber requires that each AI action be enabled before allowing an AI to be able to call it.
Steps
Step 8a
Edit the action
Click the edit icon on the reserve_tickets action.
Step 8b
Navigate to the AI tab
Click on the AI tab in the action editor.
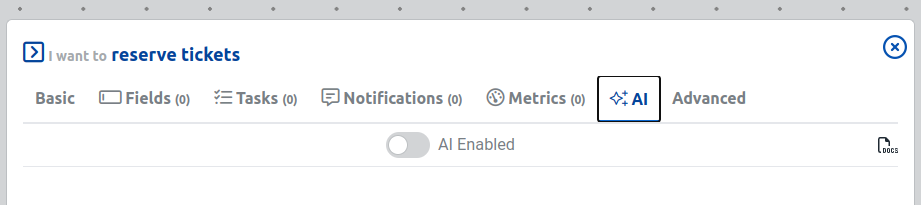
Step 8c
Enable the action for the AI agent
Click the AI Enabled toggle to enable the action for the AI agent.
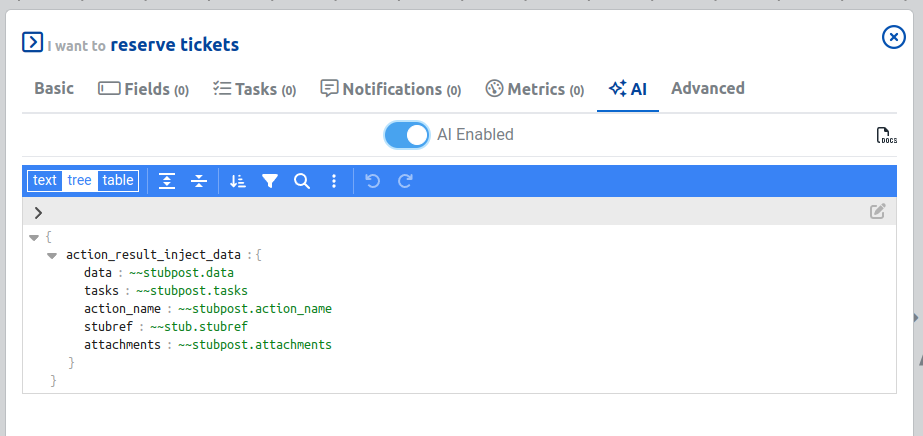
Results
Great! Now the AI agent can use the reserve_tickets action in the conversation.
9. Adding fields to the action
Overview
In order for us to collect structured data from the AI agent we need to add fields to the reserve_tickets action.
Fields are the part of an action that facilitates the collection of data.
When the AI agent calls the reserve_tickets action, the action fields will indicate to the AI wha data to collect from the user.
Steps
Step 9a
switch to the Fields tab
Click on the fields tab on the action editor.
Step 9b
Add a name field
Click the Add Field button to add a new field to the action.
Step 9c
Search for a text field
Type in text in the search field to find a text field.

Step 9d
Add the text field
Click Add this item to add the text field to the action.
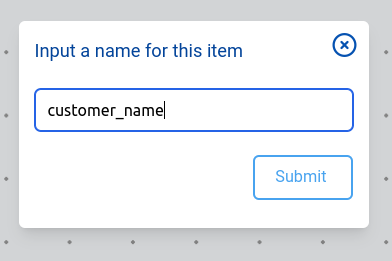
Step 9e
Name the field
Name the field customer_name.
Step 9f
Add a number of tickets field
Click the Add Field button to again.
Step 9g
Search for a number field
Type in text in the search field.
Step 9h
Add the number field
Click Add this item to add the text field to the action.
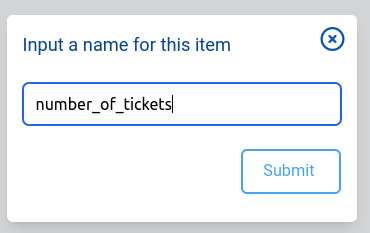
Step 9i
Name the field
Name the field number_of_tickets.
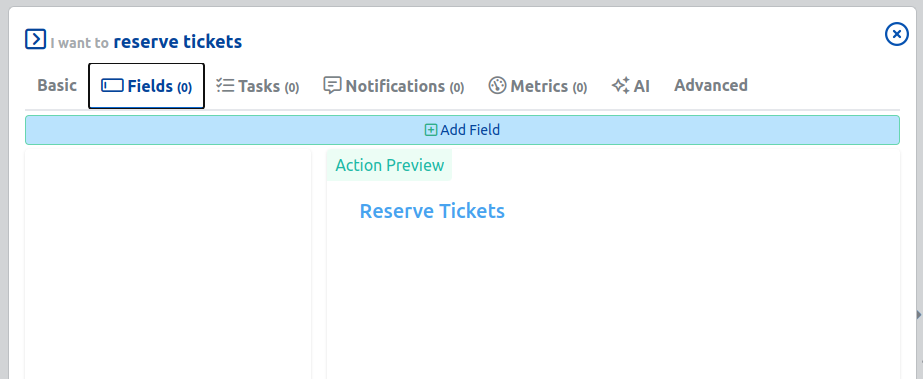
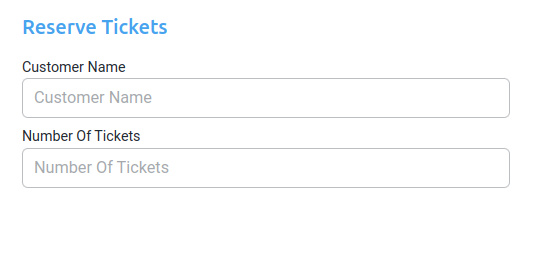
Results
On the fields tab of the action editor you should now see the Action Preview.
The resulting fields in a form should look like this:
You should now be able to create a new stub and chat to the Circus Clown AI Agent on Whatsapp once more.
Things you can now try :
- Ask the AI agent to reserve tickets for you
- See how the AI collects the data from the fields you added
We've now allowed our agent to reserve tickets for the circus, by allowing it call the reserve_tickets action and collect the necessary data.
10. Adding a notification
Overview
Lastly we can add a notification to the action to send an email to the circus to reserve the tickets.
This is a simple way to show how you can integrate with other systems.
We can add a notification to the reserve_tickets action that will send an email to the circus with the details of the reservation.
We're going to use variable substitution to include the customer name and the number of tickets in the email body text.
Steps
Step 10a
Edit the action
Click the edit icon on the reserve_tickets action.
Step 10b
Navigate to the Notifications tab
Click on the Notifications tab in the action editor.

Step 10c
Add an email notification
Click the Add Notification button.
Step 10d
Search for email
Type in email in the search field and find the Email to email address notification.
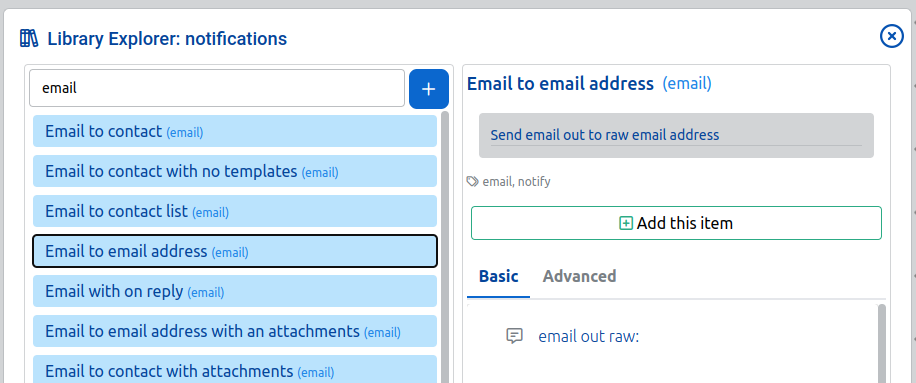
Step 10e
Add the email notification
Click Add this item to add the Email to email address notification.
Step 10f
Name the notification
Name the notification send_email_to_circus.
Step 10g
Configure the email notification
Click on the edit icon on the send_email_to_circus notification.

Step 10h
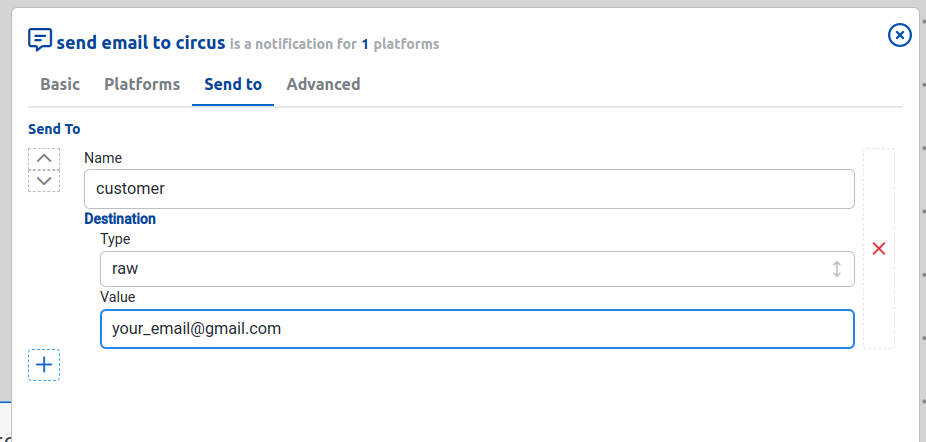
Set the destination email
Click on the Send To tab.
Step 10i
Set the destination email
Edit the value field under the Destination -> Value section to set the email to your email address.
Step 10j
Set the email body
Start typing in the Message field. Type :
Hi, {{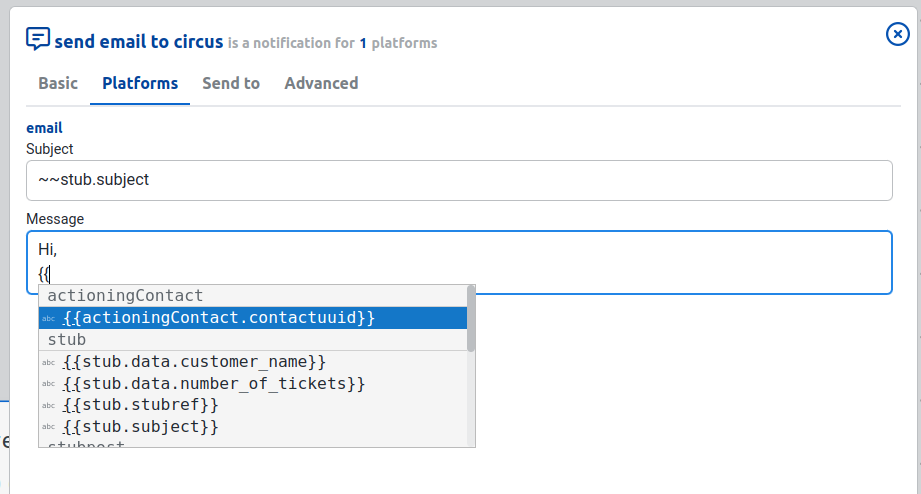
Step 10k
Select the customer name
Type
customerand select the stubpost.data.customer_name variable.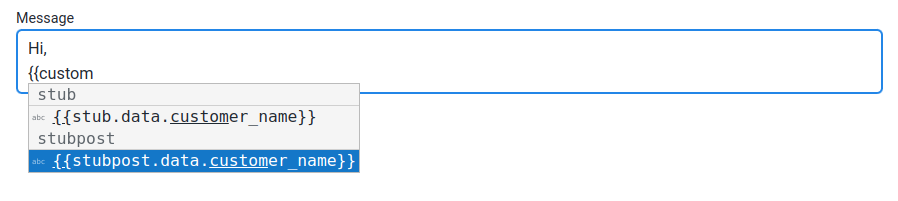
Step 10l
Add the number of tickets
Type
{{and select the stubpost.data.number_of_tickets variable.Step 10m
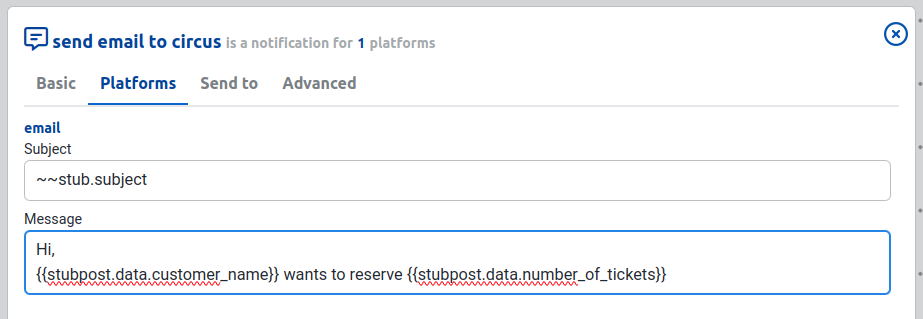
Complete the email message
Set the final email message to look like this :
Hi, {{stubpost.data.customer_name}}, you have reserved {{stubpost.data.number_of_tickets}} tickets for the circus.
Results
The final email message should look like this:
We're now ready to create a new draft stub and test the full conversation with the AI agent.
You should be able to chat to the agent and then reserve tickets for the circus.
You should receive an email with the details of the reservation.
Congratulations! You have now built a Whatsapp AI Agent that can reserve tickets for the circus.